In this article, you will learn how properties work in the portal and how to create a new property.
Properties in Mestro Portal are designed to represent your physical properties. Imagine a slimmed down digital copy containing information relevant for monitoring and follow up. The next step after creating a property via the user interface is to add meters. You also have the option of creating buildings and building components (virtual units of the property).
Useful further reading:
The digital images are the frames of your monitoring, meters with associated data are the walls and roofs and property information paint, windows, the interior and so on. Once in place, you are able to make full use of the portal's powerful tools to analyze the usage of your portfolios. Our most popular tool is the usage report. Continue reading to learn more!
How to add a property
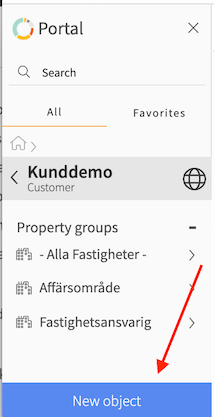
The procedure to add a property in Mestro Portal is relatively simple. Begin by clicking New object.
N.B: Your access level dictates if/what you are allowed to add or change in the system. Read this article to learn more!

Select the option Property. We suggest that you create a property in a group named All Properties. From there you can place the property in different groups, depending on your needs.

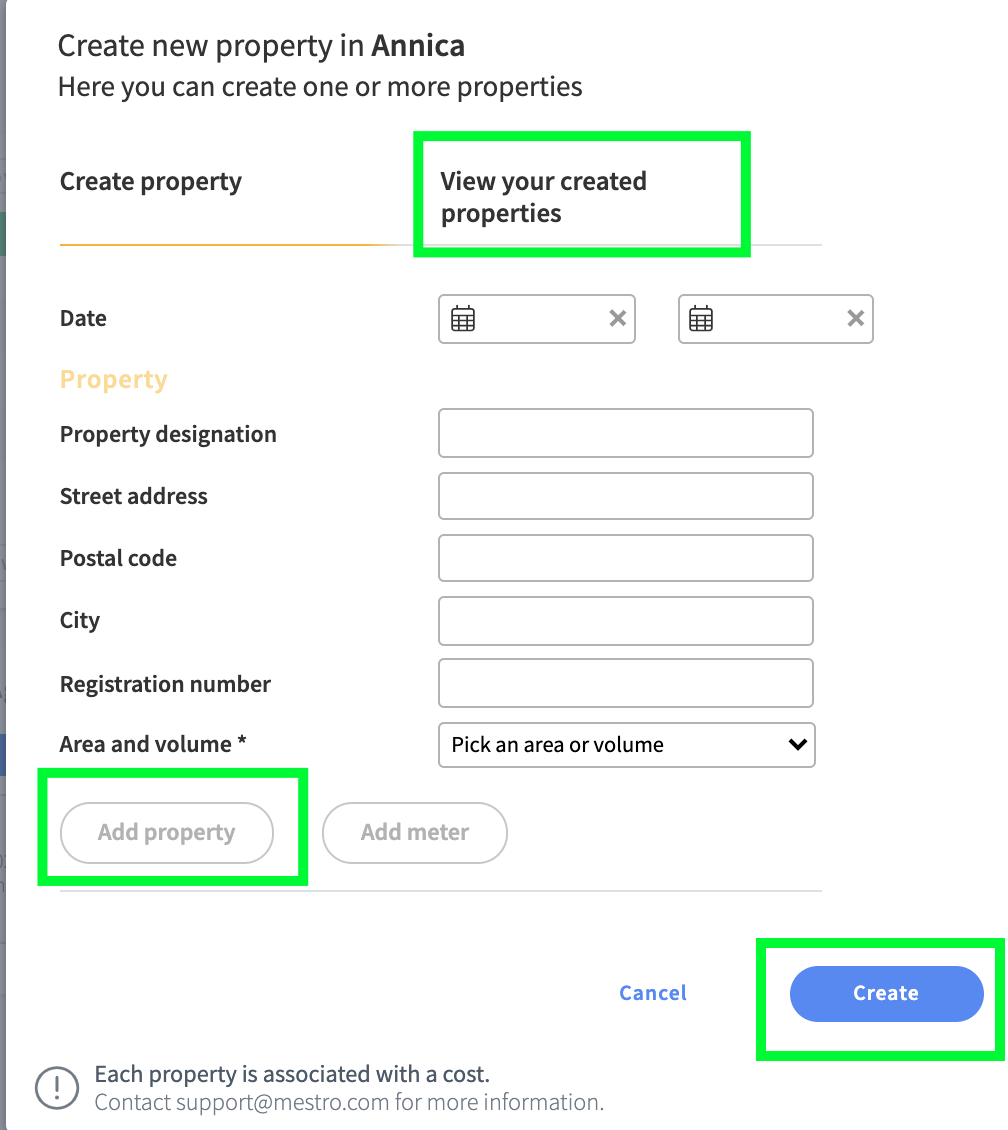
Step three is to enter basic information about the property in the box below. This is the step where you choose whether or not the property is composed of multiple buildings and register your account's default area. Default area is chosen by your system administrator.
The date fields are important. Enter the date you acquired the property in the left-most box. This influences which data that are included in reports and analytical tools by regulating data coverage.

When you have entered all the information, press "add property" and after that you have two choices:
-
If you want to add more properties, just enter information about the next property in the fields and press "add property". When you are satisfied with the number of properties, press "create" and voilà, your properties will be visible in the tree at the same time. You can also choose to preview your created properties before pressing "create" by pressing "see your created properties"
-
If you are satisfied with a property, press create after you have pressed "add property"
At this point you have probably created your first property - great work! The next step is to enter the remaining property information in the Edit tab, create meters and maybe even buildings or building components.
TIP: Make your monitoring more intuitive and create more value by grouping properties!
Add Building
If you want to divide your property into different buildings, proceed as follows:
- Go to the property you wish to create a building on
- Select Building after pressing New Item
- Fill in the required information and press Create
Finally...
We are a developing company and appreciate your feedback! If anything is unclear or you wish to share your ideas, don't hesitate to contact your Customer Success Manager or send an email to support@mestro.com .
